I Got You Captivated! – Evil Twin & Captive Portal Attacks
Hi all, It’s been a couple of days that I’ve been exploring Evil-Twin attacks. The version you see most in the wild and in automated tools is retrieving the key or password of the legitimate wireless network. Although that is very powerful, I found it kind of boring from the beginning. So I started wondering how the Evil-Twin attack could be extended to broader attacker goals: initial access, AD DS, and Entra ID compromise.
Lorenzo Meacci @kapla
9/22/202514 min read

Evil-Twin attack — introduction
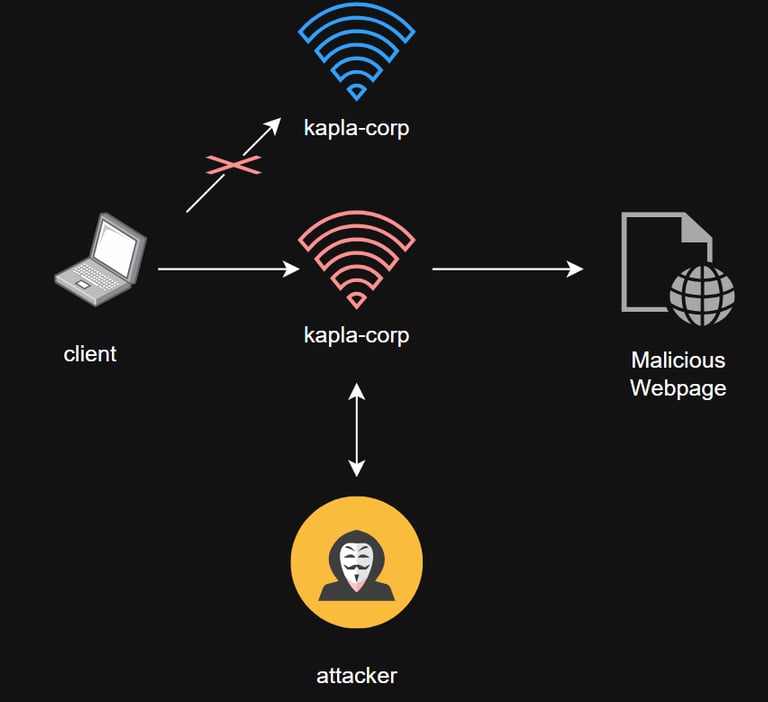
An Evil-Twin attack involves an attacker creating a rogue access point (AP) that mimics a legitimate network. The attacker then passively or actively disconnects clients from the real wireless network and tricks them into connecting to the Evil-Twin. Once clients connect to the rogue AP, the attacker can perform different follow-on attacks. The most common aim is capturing the legitimate wireless network key/password to gain access to the target company's logical/internal network. I find that approach useful but somewhat limited; for that reason, I wanted to expand the Evil-Twin concept into different initial-access / breach scenarios.
In this blog post, I will showcase different attacks and scenarios. Here’s a quick syllabus of the post:
How to conduct a basic Evil-Twin attack
Captive portal on Windows and iOS — what’s the difference?
HTML smuggling for malware delivery via the captive portal
Apache2 redirection for harvesting and relaying credentials in AD DS (Active Directory Domain Services)
Entra ID / Azure AD OAuth abuse with a malicious application
Evil-Twin attacks on WPA3
How to conduct a basic Evil-Twin attack
For Evil-Twin attacks you need some physical hardware. At minimum you need two wireless cards: one will create the rogue access point (AP) and the other will be used to deauthenticate or disrupt the legitimate network, tricking devices into connecting to the Evil-Twin. The wireless cards I use that meet this requirement are the AWUS1900 and the AWUS036NHA. Both support monitor mode and master mode.
Once the cards are connected to the laptop and visible (drivers installed), we can start scanning the air to identify the target network and its properties, such as encryption type, channel, BSSID (MAC address), and SSID (network name). We need these details to mimic the network correctly.
To do so, we need to put one of the wireless cards into monitor mode. Monitor mode lets us capture all wireless frames on the channel, including packets not addressed to our MAC address, which is necessary to observe other devices and identify the target network.
And we can start scanning using the airodump-ng tool from the aircrack-ng suite. With a command like airodump-ng wlan0mon the wireless card hops rapidly through all 14 channels in rotation to identify multiple networks. Remember that a card cannot be on multiple channels simultaneously, so if you need to reuse the same card for another attack you must stop airodump-ng or specify a channel with the -c <channel> flag.
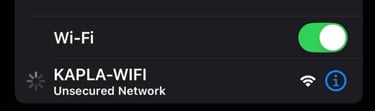
We get several useful pieces of information from the output above. First, the KAPLA-WIFI network is operating on channel 6 and the encryption type is WPA3, so a normal deauth attack with aireplay-ng will NOT work. The BSSID (network MAC) is 3C:A7:AE:AA:7E:38, and a client (my iPhone) is connected with MAC 6C:B1:33:A4:91:BC. With the above information we can start creating our Evil-Twin
note: Some client MAC addresses will change during the blog because I'm using different devices to test the attacks
Captive portal on Windows and iOS — what’s the difference?
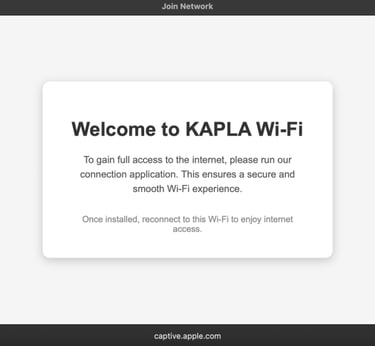
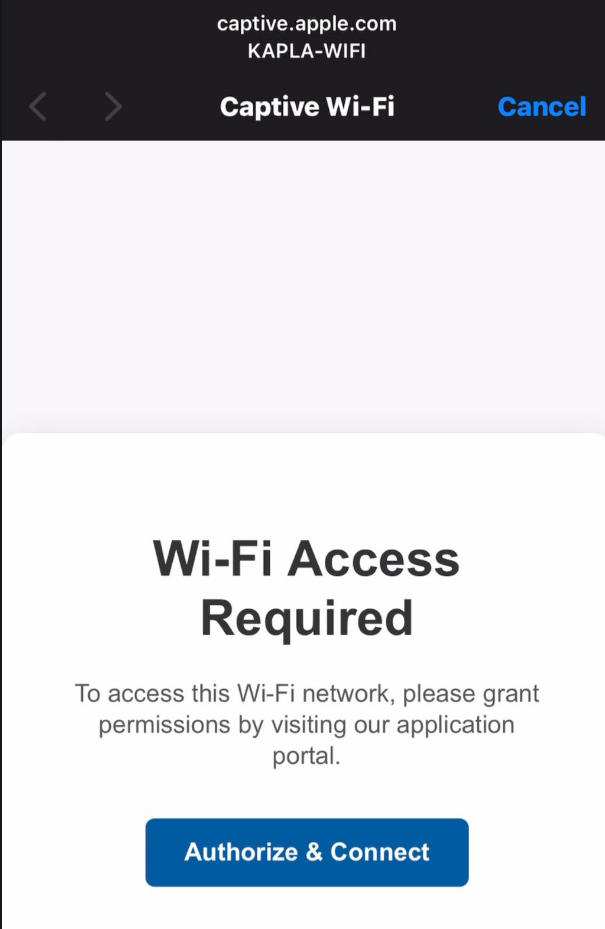
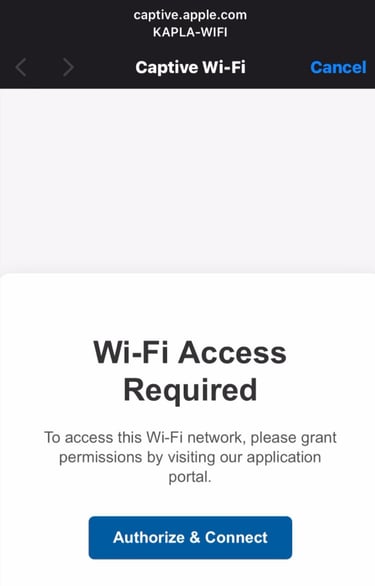
Before we start creating the Evil-Twin there are some essential notions you need to know first. Firstly what we are actually abusing is the built in behavior of devices to open captive portals, A captive portal is a web page that users must see and interact with before getting internet access on a network. You often see them on public Wi-Fi in cafés, airports, or hotels. When a device connects, the network redirects the user’s first web request to the portal, which may ask for login credentials, agreement to terms, or other info. Attackers can use malicious captive portals to steal credentials or deliver malware.
But how do devices know there is a captive portal? Quick answer: They don’t, at least not automatically. On iOS, the device sends an HTTP GET request to http://captive.apple.com/hotspot-detect.html. If the response is not "Success", the device assumes either there is no internet or that the network is blocking access, which indicates a captive portal.
Any HTTP request can then be redirected to our captive portal page, which opens that familiar pop-up window. This window is sandboxed, so some JavaScript tricks like HTML smuggling will not work on IOS devices.
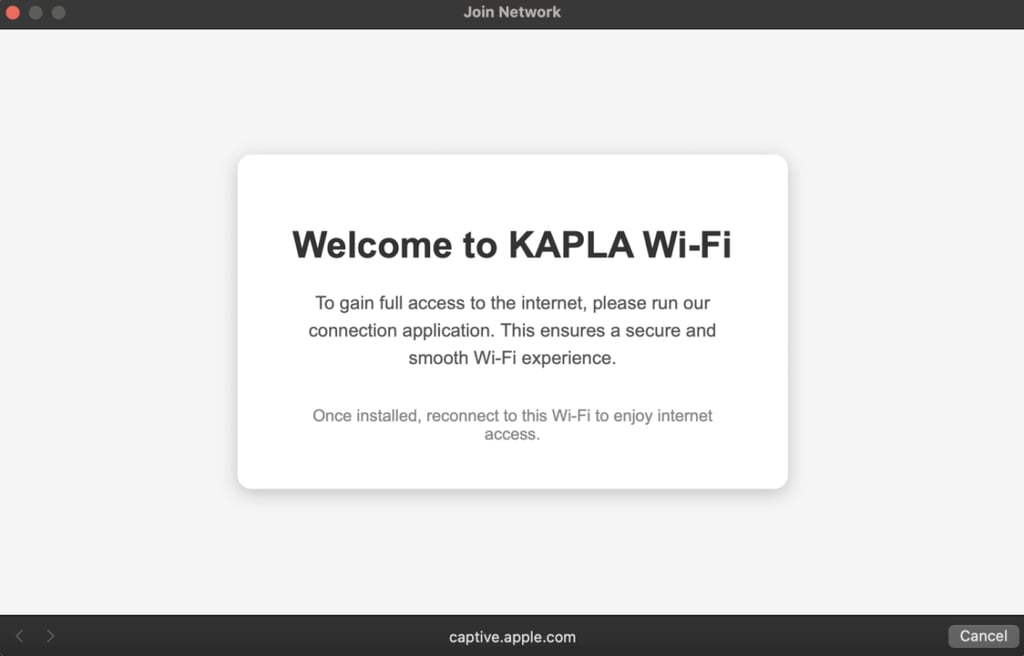
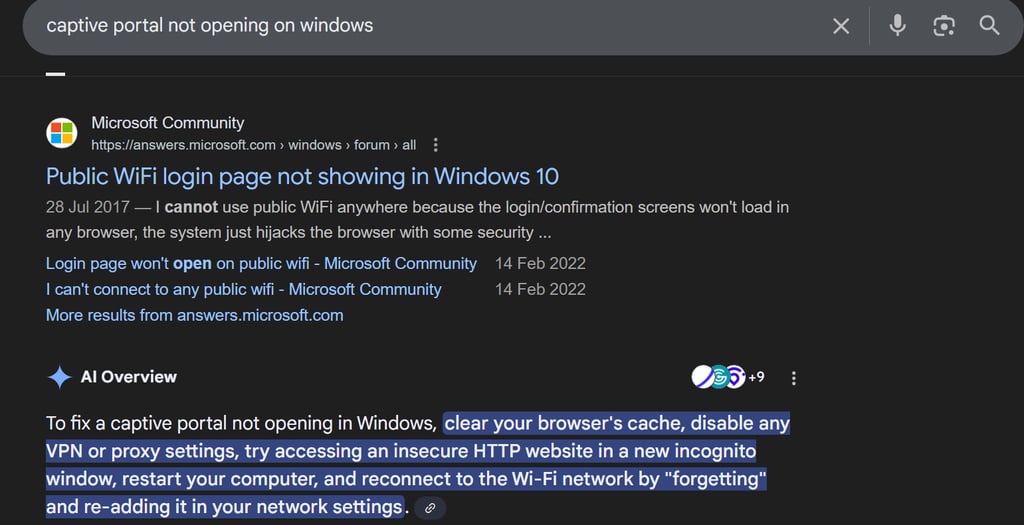
On Windows, it’s a different story and it had me banging my head for five hours straight. There are tons of users complaining that the captive portal does not open automatically.
At first, I just assumed the OS had some strange logic and that Windows was… well, just being Windows. Turns out I was right. Basically, Windows periodically checks for internet access using a hard-coded URL: http://www.msftconnecttest.com/connecttest.txt. It expects the response to be "Microsoft Connect Test". If anything unusual happens, like a redirection, Windows will silently exit and never open the captive portal.
On the other hand, if we (using Apache2) serve back "Microsoft Connect Test", Windows will open the default browser and display our captive portal. This is a bit cursed, but also very powerful because unlike iOS, Windows opens a full browser, which allows us to run JavaScript tricks like HTML smuggling. Don't worry if you don't understand it now it will click later on.
Now you are armed with all the necessary knowledge to perform the upcoming attacks.
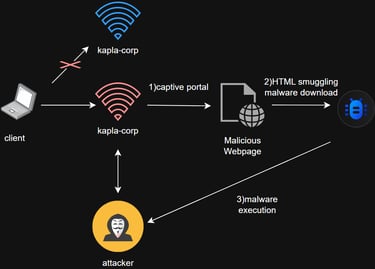
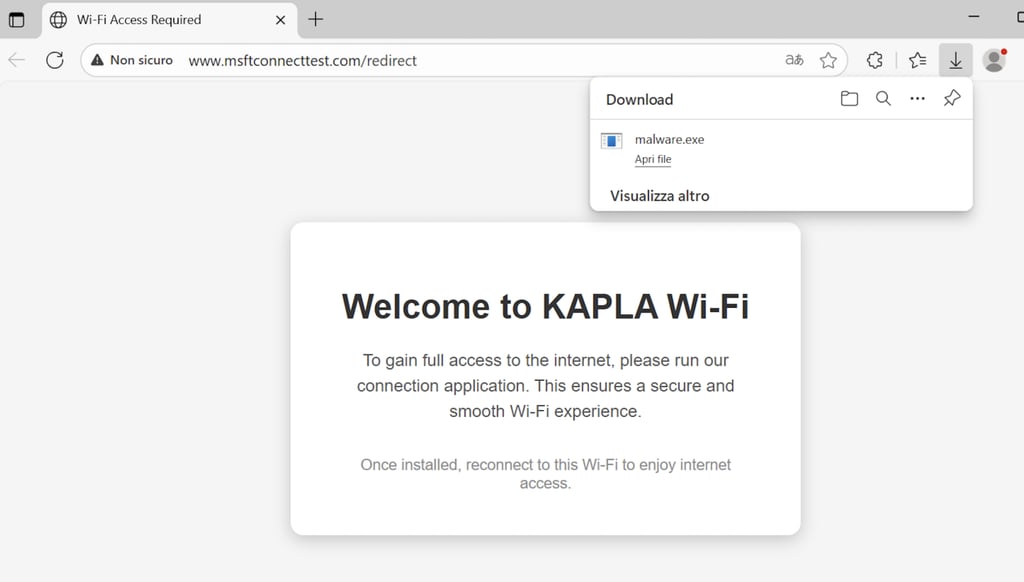
HTML smuggling for malware delivery via the captive portal
HTML smuggling is what I call “JavaScript magic.” The technique has been around for a while: it consists in embedding files as Base64 inside an HTML5 page and uses JavaScript to automatically decode and download them to the victim who visits the page. This technique is surprisingly powerful for bypassing web filters, because scanners inspecting HTTP requests do not see the embedded file content.

In your kali machine you need to install apache2 and enable the rewrite engine as follows, this will be used to host the captive portal:
enable the rewrite engine with this command:
edit /etc/apache2/apache2.conf to:
Then we need to set up an .htaccess file inside /var/www/html/ as usual. This file is responsible for prompting users to sign in to our network.
Now we need to configure DNS and DHCP for the wlan1 interface. This configuration will handle IP assignment and redirect every client that connects to the rogue AP to our captive portal. I will be using wlan1 to host the rogue AP. dnsmasq can be used for this purpose with a configuration file like the following. Save it as dns.conf or any name you prefer:
configure the valid IP address for our access point interface:
To set up our rogue access point, we use the following configuration file and save it as hostapd.conf:
start dns server and hostapd:
then edit the /var/www/html/index.html file with the html smuggling template:
put the base64 binary with the following: In this case for POC I am not using a real implant
With the current configuration, the captive portal will not appear on Windows. This is because we are not serving the connecttest.txt file containing the expected "Microsoft Connect Test" message.
To make the captive portal actually show up on Windows, we need to serve that exact message on the Apache2 webpage. You can use the following setup to achieve this:
Basically, with this setup we are redirecting all traffic to index.html except for the connecttest.txt file, which will be forwarded normally. Once this is done, the browser will open and display index.html with the HTML smuggling template.
Instead of embedding the .exe directly into the template, it is more OPSEC-safe to actually pack the payload. I go into more detail on this in my blog post “Advanced Initial Access Techniques”
DEMO
The client connects to the rouge AP:
We see in dnsmasq the requests: www.msftconnecttest.com (Because it's a windows laptop)
Laptop connects back to the index.html automatically downloading the poc file:
Attack summary: We are using Apache2 to host the captive portal webpage, Hostapd to run the rogue AP, and dnsmasq to handle DNS and DHCP. When a client connects to the Hostapd AP, it is assigned an IP from dnsmasq, and all requests are resolved to the internal IP of wlan1. Apache2 then handles the requests, rewriting them to index.html.
Apache2 redirection for harvesting and relaying credentials in AD DS
Following the same captive portal logic, we can redirect the traffic not to the captive portal itself, but to an HTTP/HTTPS NTLM-protected endpoint. If we use a tool like ntlmrelayx, we can relay the authentication to LDAP on the domain controller (unless LDAP signing is enabled, which by default it is not) and potentially abuse any ACL privileges the user has. Alternatively, we can capture credentials in cleartext or as NTLM hashes using a tool like Responder.
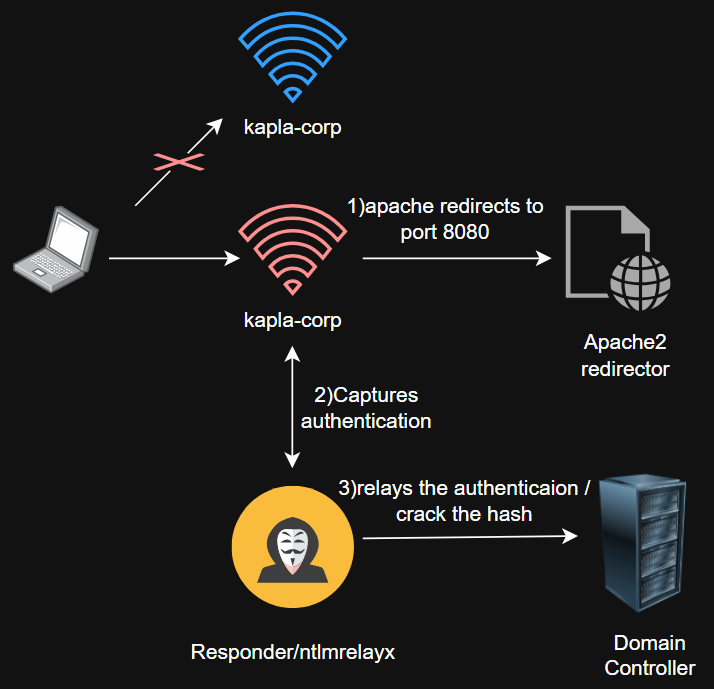
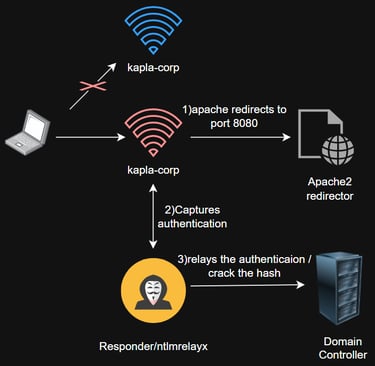
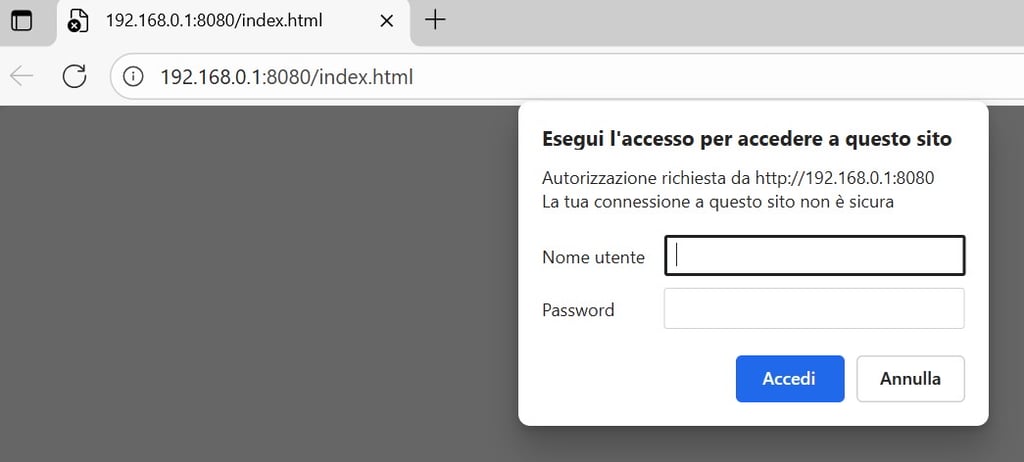
Remember that we still need to trick Windows into opening the captive portal, and these tools are not flexible enough to handle redirection, serve custom webpages, or interact with the browser. Therefore, we keep Apache2 running. The main change is that, instead of redirecting traffic to index.html, we redirect it to http://192.168.0.1:8080/index.html, like this:
First case scenario: Responder
remember that our apache2 server is hosted on port 80, and therefore we can't use it to listen with responder. To change the HTTP listening port of Responder you need to edit this line and replace 80 with 8080

Now we can start the tool:
The -b flag is used for basic authentication. This means that it's just an HTTP password protected endpoint, so the user credentials will be captured in clear text


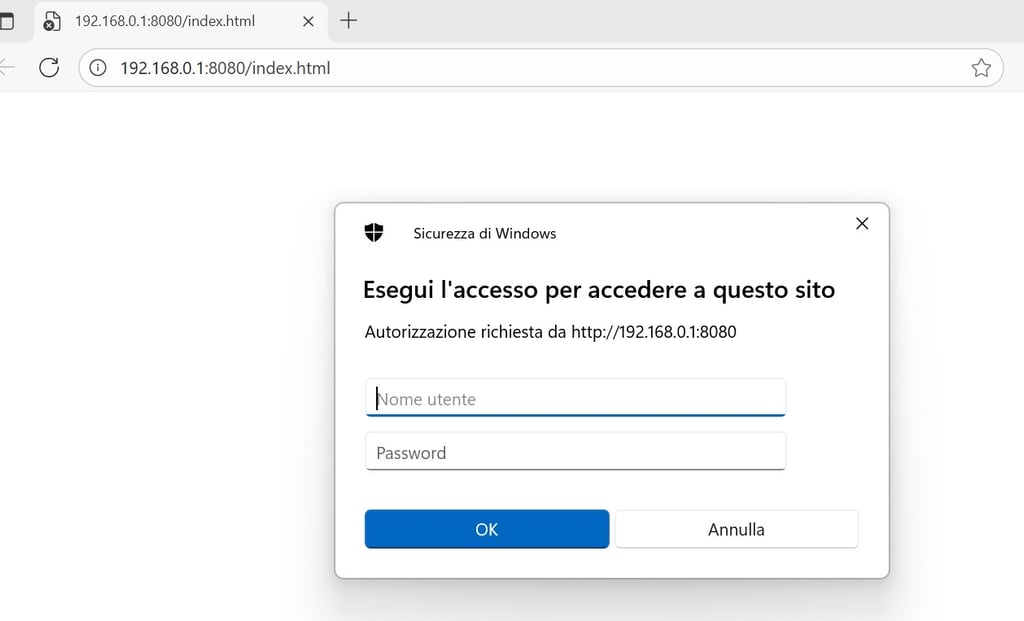
We can remove the b flag to capture the NTLM hash instead. This type of web authentication is what ntlmrelayx uses to relay NTLM. As you can see, the login page is different when this method is used since this is a windows NTLM auth.
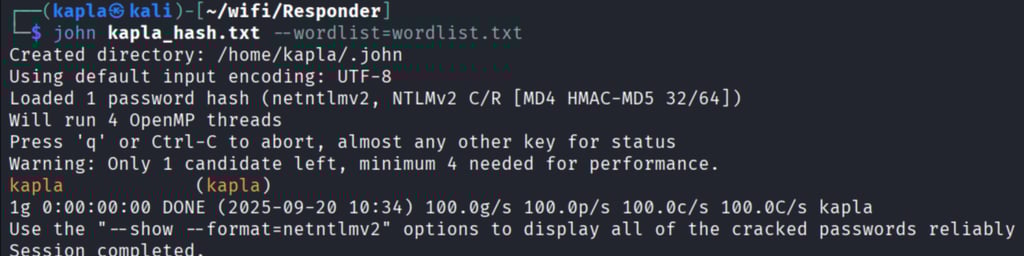
I don’t have a domain controller to relay to at the moment, for this proof of concept I will capture the NTLM hash and crack it offline. This is also a good practice when you are not in an AD DS environment.
cracking with john:
Entra ID / Azure AD OAuth abuse with a malicious application
In the first two attacks, I showed how to get initial access via malware delivery and how to steal or relay credentials in an AD DS environment. Today, many AD DS environments are moving to Entra ID (formerly Azure AD). Instead of capturing or relaying hashes, we can trick the user into giving up their token.
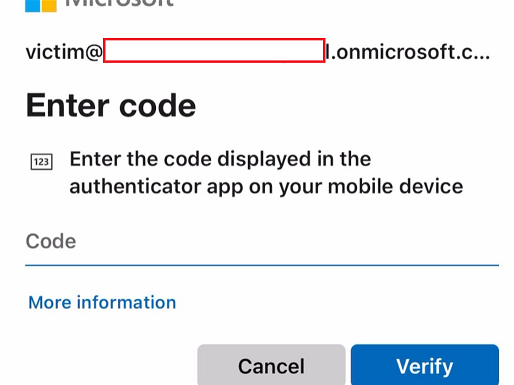
Entra ID uses token-based authentication rather than Kerberos or NTLM. There are several ways to steal user tokens, but for this scenario, the most practical method is to use a malicious Azure application targeting the OAuth protocol. OAuth allows third-party applications access via access tokens. These tokens do not reveal the user’s credentials, but if stolen, they can be used to authenticate and bypass MFA (if enabled).
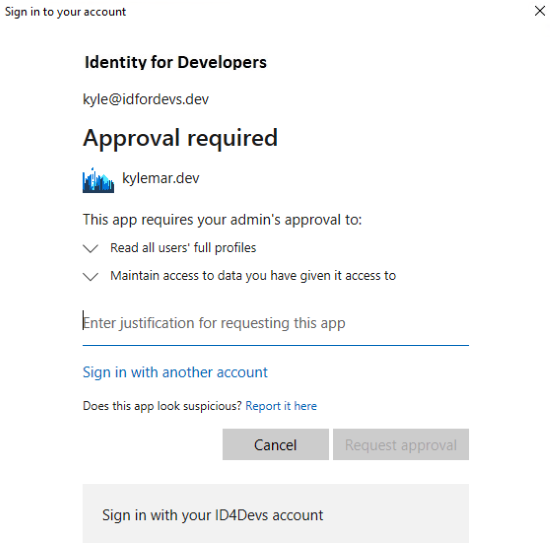
We can create the malicious app in our own tenant and trick the user into granting it access. To make it convincing, we could ask the user to log in with their Entra ID account to gain access to Wi-Fi.
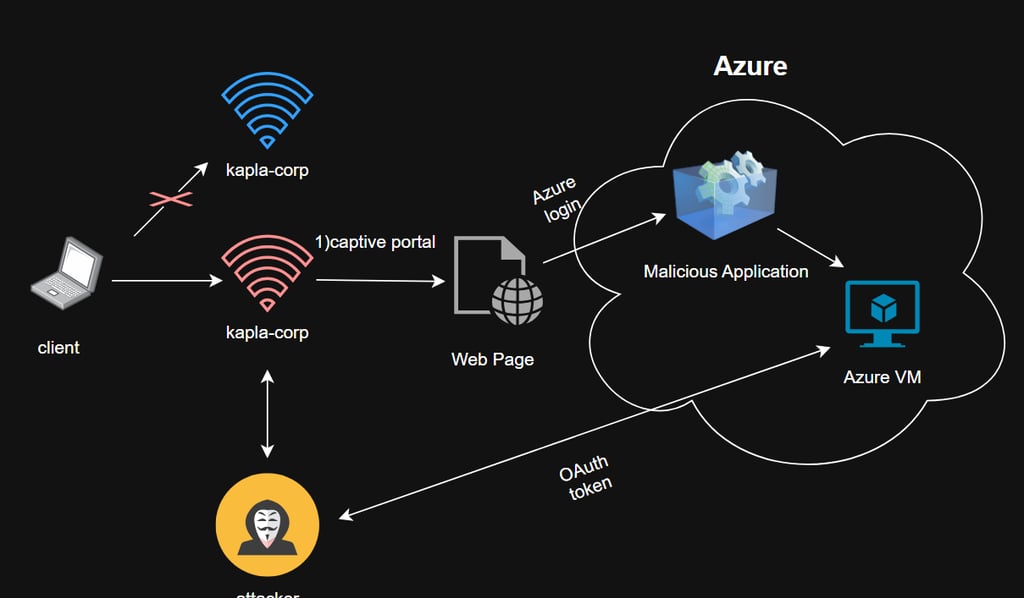
Requirements: An Azure tenant and a VM with a public IP address.
Attack flow:
The attacker creates an Azure application named “WIFI Access.”
The victim is redirected to the application page (the AP must allow the client to access that URL via the dnsmasq config).
The victim clicks “Consent” for the application.
The user grants the permissions requested by the application.
The access token is sent to the attacker on the cloud VM.
Profit.
This is by far the most complex of the three attacks. It took me some time to work around various errors, as the tool used for this attack required some tweaks.
We are going to use this tool to perform the attack
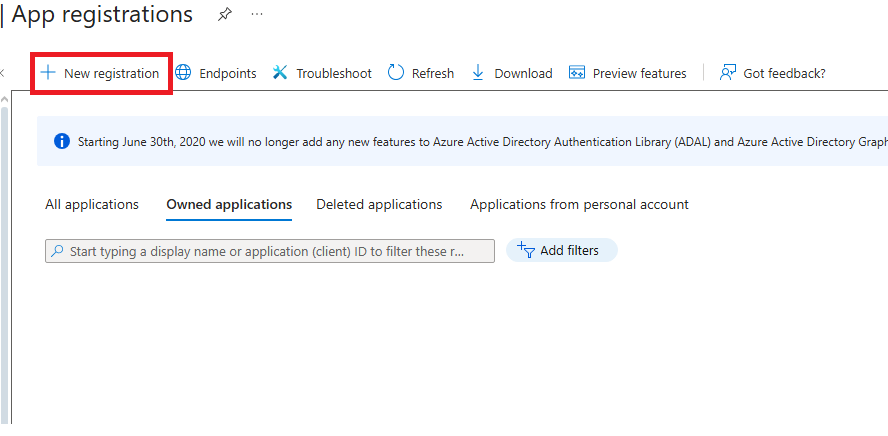
First login to your azure tenant (I am executing this attack inside the same tenant but it doesn't really matter) and navigate to -> Microsoft Entra ID -> App registration -> New Registration:
Now create the application and give it a relevant name for the attack. In my case, I named it WIFI Access. Make sure to select the Multitenant option so that users outside your tenant can authenticate to the app.

Once the application is created navigate to Authentication -> Add a platform:
Then choose Web as the platform. Here, you can enter the application URI, which should point to your cloud VM. (I created a Linux VM in my Azure subscription, but you can use any provider you like, such as AWS.) I’ll leave the firewall configuration up to you. For more guidance on setting up the VM, check out my blog post “Creating a C2 Infrastructure in AWS,” as the concepts are very similar.
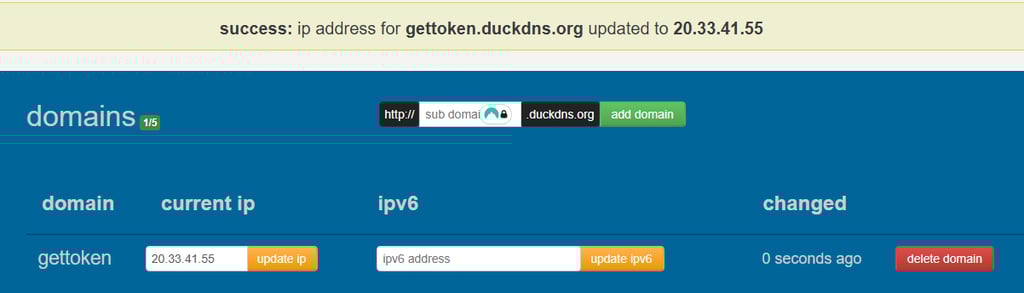
In this case, my public IP for the VM is 20.33.41.55, so that is what I would put in the Application URI. Unfortunately, Azure does not allow an IP address here, so we need a domain.
In a real red team or penetration test engagement, I would register and use a proper domain. For this proof of concept, I will use https://www.duckdns.org, which allows us to create a subdomain and point it to our IP address.
To protect PynAuth, we should put it behind Nginx and use Certbot. We also need to obtain an SSL certificate to enable HTTPS.
then Configure Nginx Reverse Proxy: /etc/nginx/sites-available/myapp
enable it:
Get SSL Certificate:
restart nginx and then you should be able to access the app on that port via HTTPS:

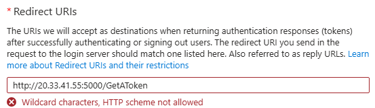
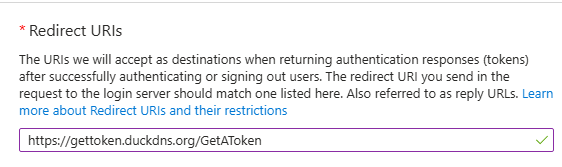
So now in the Webapp redirection URL put this address this is where the token will be sent too:

Next, go to Certificates & Secrets and create a New Client Secret. This string is used by the application to prove its identity when requesting an access token.

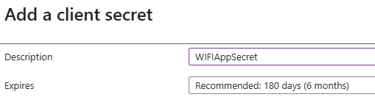
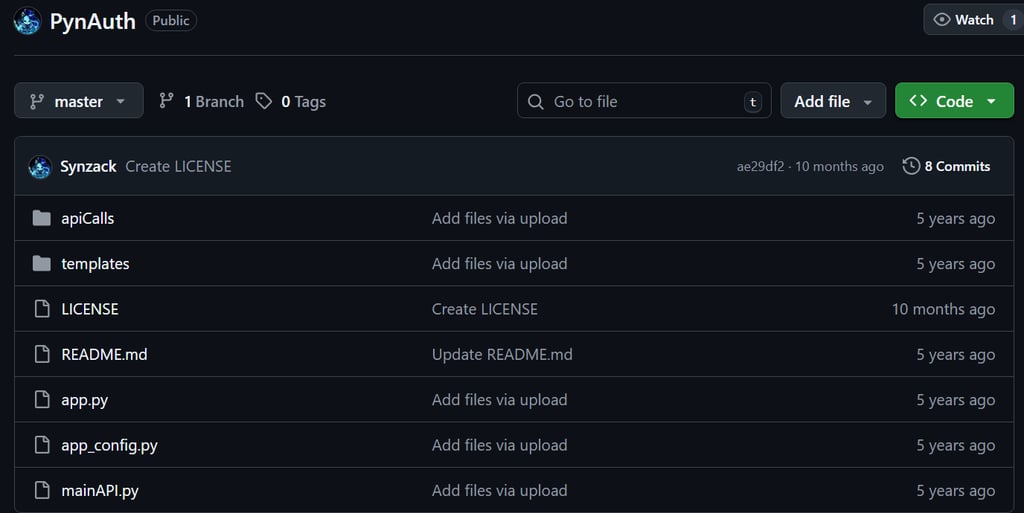
Now you need to copy the secret value and the app Id, these details will be used by PynAuth.


Now, go back to the Azure VM and edit the app_config.py file inside the PynAuth repository. Update the following variables:
CLIENT_ID – set this to your application ID.
CLIENT_SECRET – set this to the client secret you copied earlier.
SCOPE – define the permissions that the application will request from the user.
Some of these permissions require admin consent, so make sure to read the documentation before selecting which ones to request.
After installing all the requirements, we need to modify the tools. Since Azure expects HTTPS and not HTTP, we need to configure the Flask server in PynAuth to use HTTPS. To do this, edit the app.py file at the bottom and change it from this:
to:
then run it:
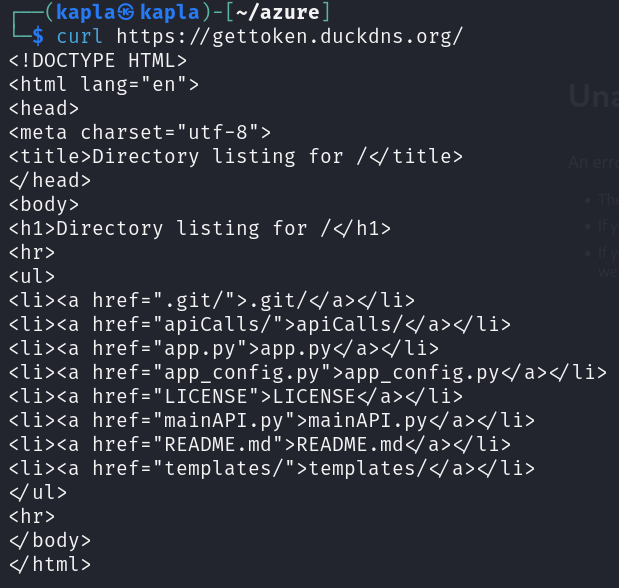
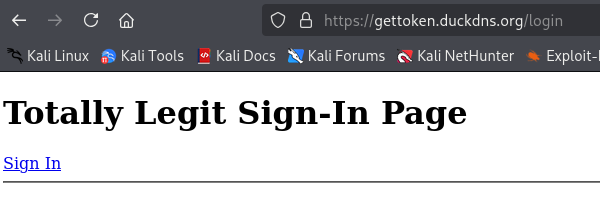
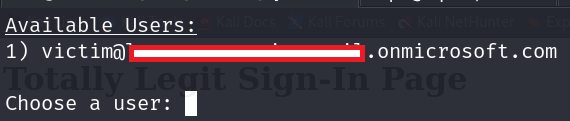
Now we need to visit this site to get a phishing link. That singn-in link is the phishing link: https://gettoken.duckdns.org/login

With the current dnsmasq configuration, all traffic is redirected to our local interface wlan1. We need to allow certain domains of interest to resolve normally instead of being redirected to the captive portal. In this case, these domains are *.microsoftonline.com and gettoken.duckdns.org
Now we need to configure Apache2 to stop redirecting all traffic. Instead, we will serve a template that prompts the user to grant permissions to the application to access the Wi-Fi.
go back to the old .htaccess config:
allow internet connection:
DEMO
The user connects to the WI-FI:

The user will be prompted to sign in and if in place MFA:

Once the user logs in, they will be prompted to grant access to the application. After granting access, the application will receive the token.
Here is an example (I forgot to screenshot my own app, lol):

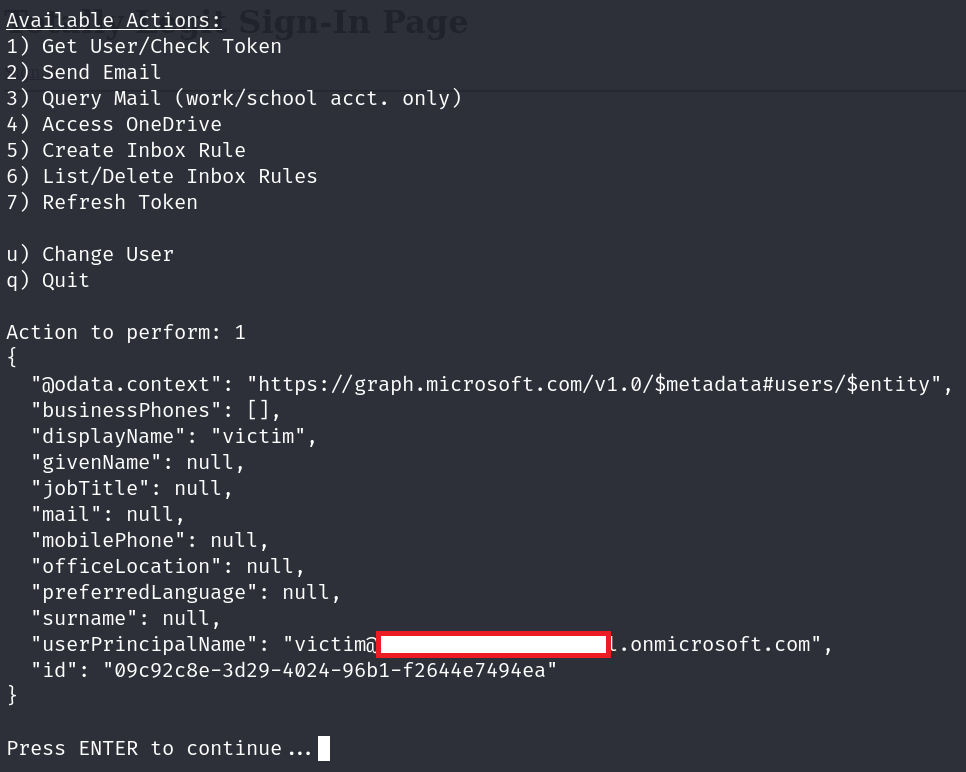
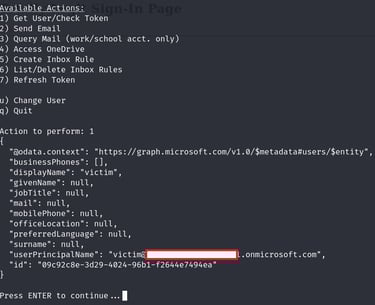
Once we have given access to the App we will get the token back in PynAuth inside our cloud VM


This token can then be used to impersonate the victim: run mainAPI.py

then we can perform the following actions on behalf of this user:
for more information on this technique: https://research.eye.security/consent-and-compromise
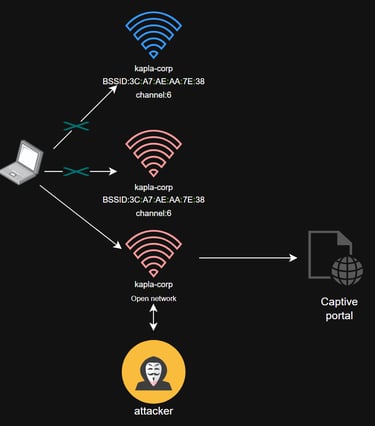
Evil-Twin attacks on WPA3
Up to this point, we haven’t launched any deauthentication attacks. In fact, I manually connected to my malicious access point, simulating a user willingly connecting to our open network. Now, I want to show a less opportunistic approach where we actively disrupt the connection between a legitimate access point and its clients, forcing them to connect to our AP instead.
Remember that the KAPLA-WIFI is our target network and uses WPA3
In a standard WPA/WPA2 network, we could use a tool like aireplay-ng to deauthenticate clients from the legitimate network. Unfortunately for attackers, this method does not work against WPA3 networks, as shown above (“ENC: WPA3”).
For WPA3, we need to create a DoS scenario that makes the legitimate AP inaccessible. This can be done using MAC collisions or a Loud MANA attack, where our access point mimics the legitimate network’s BSSID and ESSID.
In our scenario:
ESSID: KAPLA-WIFI
BSSID:3C:A7:AE:AA:7E:38

Attack explenation
One of the major issues in Wi-Fi networks is collisions, which occur when two devices transmit on the same channel at the same time. Channels were designed to reduce interference and minimize these collisions. If two access points use the same MAC address, network conflicts occur, disrupting communication.
To perform the attack, we need to:
Change the MAC address of our wireless card to match the target network.
Set the AP to use the same ESSID (e.g., KAPLA-WIFI).
Have a strong rouge AP signal
We will create two APs:
The first is a copy of the target network, protected with WPA2, used to create disruption.
The second is the open evil-twin we used earlier for client-side attacks. This AP should mimic the SSID and channel for authenticity.
This is my disrupt.conf file for the first AP:
Next, change the MAC address of wlan1 to match the legitimate AP (3C:A7:AE:AA:7E:38):
Then, install hostapd-mana, a tool that supports the Loud MANA attack, and start the first AP:
Next, tweak the previous hostapd.conf file to match the new channel:
Notice that the MAC isn’t changed here to avoid collisions.
From the client side, the only network visible will be the open one we created with hostapd:
From this point, the client-side attacks proceed as before. The first AP creates disruption on the legitimate network, while the second open evil-twin allows us to execute captive portal, HTML smuggling, or any of the previous attacks.
Remediation
There isn’t a simple fix. The only effective ways to protect your network from these types of attacks are active monitoring and user awareness. Active monitoring involves continuously watching for rogue access points, unusual traffic patterns, or unexpected changes in your Wi-Fi environment. User awareness is equally important, educating users to recognize suspicious networks, avoid connecting to unknown Wi-Fi, and report any unusual prompts or login requests. Together, these measures can help mitigate the risks, but there is no silver bullet against attacks like Evil Twin or Loud MANA.