Bypassing static analysis - Deep Dive
In this blog, I’ll walk you through the core concepts of static analysis used by AV and EDR products to inspect files written to disk. I’ll also demonstrate various techniques you can use to craft payloads that evade detection during this scanning phase.
RED TEAM PATH
Lorenzo Meacci @kapla
5/17/202511 min read

Hi all, in this blog post, I will guide you into grasping the methodology for bypassing static analysis.
But What Is Static Analysis?
Static analysis is the first scan that AV/EDR products perform on a downloaded file as soon as it touches the disk. Common checks include, for example:
Calculating the file's MD5 hash and comparing it with a database of known malware file hashes:
This is a quick way for antivirus engines to identify known threats. If the hash of the file matches a hash stored in a threat database, the file is immediately flagged or blocked without further inspection.Checking for known byte sequences, also known as signatures:
Signature-based detection involves scanning the binary for specific byte patterns that are unique to known malware families. These sequences can be fragments of code or payloads that are reused across malware variants.Scanning for known strings and/or APIs in the Import Address Table that might indicate the file's behavior:
The Import Address Table (IAT) contains references to external libraries and functions the file uses. If suspicious APIs (like those related to process injection, keylogging, or networking) are found, the file might be flagged as potentially malicious.Checking byte entropy inside each PE section:
High entropy usually suggests that the data in a section is encrypted or packed, which is a common technique used by malware to obfuscate its code.
I will guide you through each of these and explain them in more detail as we go.
Using Ghidra and manually breaking signatures
The first approach to bypass static detection is by using tools like ThreatCheck to identify which bytes are actually being flagged by the AV. Then, reverse the binary to locate the code that is generating the signature and modify it—without altering the actual instructions.
For this demo, I used the Havoc payload and broke two signatures, you can continue the exercises and break all signatures as you please. For more Havoc C2 exercises, refer to this blog
Now we need to open ghidra and check for the “C8 4C 8D 0C 02 4E 8D 14 00 31 C9 45 8A 1C 0A 48” byte sequence: go in Search > Memory and paste the byte sequence

By clicking on this address will take us to the code segment with the associated bytes
There is no reliable way to determine the exact function name, but we can try comparing the instructions we see in the decompiler to make a guess about the corresponding function in the source code. In this case, I discovered that the function is "AddRoundKey" inside AesCrypt.c.
Now we need to change the function to something that compiles to a different byte sequence, we can add dummy code, variables, loops and anything that might do the work, the only thing important is that the code functionality remains the same.
For example I changed the function to this:
Now save the file, build the payload again and if the function was changed enough we should see a different signature
The process is the same as before, and in Ghidra we can see something that might help us in identify the element in the source code that is causing trouble:
From this screenshot we can see that the previous function (AddRoundKey) gets called, we can use this info to identify the block of code
The Cypher function is the one that is using AddRoundKey:
I renamed the function to something else and I also scrambled the code a bit :
Now you can scan again and continue the process. It might take time to identify some signatures, and you should also check the PE section in which these bytes are located. This might give you an idea of what could be causing the signatures. For example, if the bytes are in the .rdata section, it might be a constant hardcoded in the payload.
Packing The Payload
Another approach for evading signature-based detection is by using a packer. Packers are tools that take your payload as input and output an executable based on the specified arguments. For this demo, I used PEzor. For binaries, this packer uses donut to transform executables into position-independent shellcode (PIC) and attaches it to a template. If shellcode is provided as input instead, it skips this step. What makes this tool particularly special is that it can output different formats, such as executables, service executables, and DLLs. There are various arguments you can provide to the tool, and I encourage you to experiment with them.
After cloning the packer, we can run the following command using the -xorkey argument to specify the encryption key, the -text argument to instruct the packer to place the payload in the .text section of the PE, and finally, the -shellcode argument to indicate that the input payload is shellcode.
This tool luckily (for now) bypasses defender, but if in the future it might get flagged. In that case, you would have to reproduce the steps showcased in the Ghidra reversing section to break the signatures.
Also, the tool utilizes the GetComputerNameExA API and uses the FDQN of the machine to decrypt the payload, if you don't know the machine name beforehand that you would have to change this to something else
Signature check:
Creating your own Shellcode loader
Being able to create a custom shell code loader from scratch is the best approach because this allows us flexibility depending on the scenario we are facing.
As with all shellcode loaders, we need to follow some high-level steps to execute the payload. Malware developers have been very creative in discovering new methods and APIs to achieve the same results. Future blog posts will focus on bypassing behavioral analysis and post-exploitation execution, so creating a loader that evades the behavioral analysis of an EDR is out of scope for this post (even though all the code showcased below works on the latest Windows Defender).
The steps for shell code execution are the following:
Allocate memory space of the size of the payload
Copy the payload into the allocated memory
Change the memory protection to allow execution
Execute the payload
There are also two main families of loaders and these are staged and stageless, the difference is that staged loaders will download part or the whole shellcode at runtime while on the other hand stageless loaders will have the payload hardcoded into them.
Stageless Loader
To create the payload you can use msfvenom:
The following code can be used as a starting point
VirtualAlloc API is used to allocate the memory space for the payload, memcpy is used to copy the payload in that memory space, VirtualProtect to change the memory protection and the function pointer to execute it.
Because the shellcode is unencrypted inside the binary itself, Defender will detect it with no issue at all. One way to bypass this is by using encryption. When the shellcode is encrypted, it will not match any known byte patterns, effectively bypassing signature-based detection altogether.
Instead of using XOR encryption like PEzor does I want to show how we can implement AES encryption instead.
This will be the AES decryption function:
And the following python code can be used to encrypt the payload:
note that this is the same exact code and function of the Backdooring PE blog
This is the completed code that uses the AES encryption algorithm, the shellcode you see in the shellcode[] array is the encrypted output of the python script
We can scan the loader using thread check and no signatures will be found:
Staged Loader:
Another approach would be to download the shellcode at runtime and inject it subsequently, but there are a few notes:
Cons:
Some AV/EDR products monitor network traffic (e.g., BitDefender), and if they detect something suspicious being downloaded, they will terminate the process and remove the loader. It's always a good idea to encrypt the payload.
Downloading the shellcode results in more network traffic, which could raise suspicion.
Pros:
It's more flexible if we want to download a different payload later.
We can customize this to save the encrypted shellcode to disk, so when the loader runs again, it won’t need to make another download request.
By default, since no payload is hardcoded into the loader, no static analysis alerts should be triggered—though this is not a bulletproof approach, as I’ll demonstrate shortly.
The first thing we need is a Download function that—yes, you guessed it—downloads the shellcode at runtime from a remote HTTP server.
In this case, the execution of the shellcode is slightly different. In the previous shellcode loader, I used a function pointer to execute the shellcode instead of using the CreateThread WinAPI. Both methods are valid, but there's a key difference: when using a function pointer, the shellcode runs in the main thread. As a result, when the shellcode (e.g., from msfvenom) finishes and exits, it causes the entire loader process to terminate. By contrast, using CreateThread runs the shellcode in a separate thread, so when it exits, the main process can continue running or handle the exit more gracefully.
Additionally, the WaitForSingleObject API is used because if the worker thread is spawned and the main thread finishes before it, the shellcode might not execute properly.
Instead of allocating new memory using VirtualAlloc, since the payload is already in memory (specifically in heap memory, which is RW by default), we can simply retrieve the memory address, change the memory protection using VIrtualProtect and execute it directly from there.
Can the APIs we use be analyzed statically?
Sadly yes, even though there is no shellcode inside the staged shellcode loader, there are still some very suspicious aspects of our binary that can be analyzed statically by AV solutions.
All Windows binaries have an Import Address Table (IAT), which lists all the APIs that are imported. There are different methods to retrieve the IAT, and probably the easiest one is simply running strings on the binary.
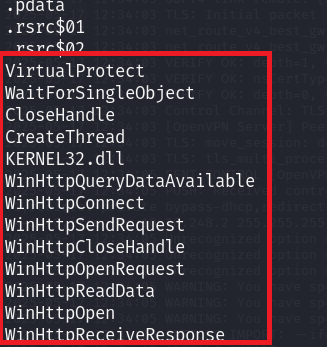

Just based on the IAT alone, some security solutions will flag our binary as malicious. There are different approaches to masking these API calls, and I will showcase the API hashing method: LINK HERE
The code was taken from ired.team, so please check it out for full details.
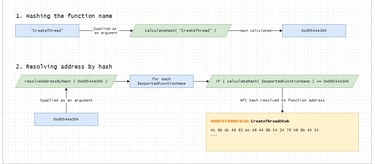
The steps are as follows:
Use PowerShell to calculate the API hash.
In the C code, implement a function that iterates through all exported functions in kernel32.dll, calculates each hash, compares it to the one we provided as an argument, and returns the corresponding function address.

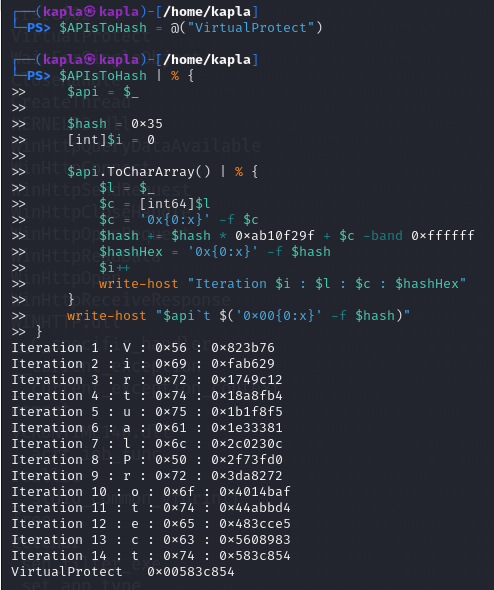
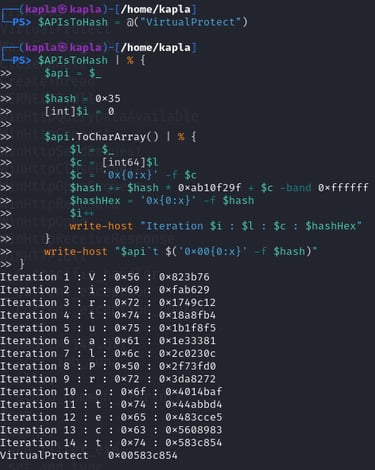
This is the PowerShell code
Because I like to keep my C code as clean as possible I created a Header file named Functions.h that will contain the VirtualProtect and CreateThread functions prototypes
then copy the getHashFromString and getFunctionAddressByHash functions from the ired blog and use them to get the function addresses:
Now by running Strings again we can see that these functions are no more present and yet the loader works perfectly:
Entropy analysis
But what is entropy?
Entropy is a measurement of randomness. If something is very random, then its entropy is high; if it follows a predictable pattern, the entropy is low.
An example of this in binaries is a memory region filled with NULL bytes—this would have an entropy close to 0, because the next byte is very predictable (it’s going to be a 0). On the other hand, if we have a region filled with encrypted data, the bytes will appear random, and the entropy will be high.
In PE-bear, we can open the AES-encrypted shellcode loader and check the .data section, where we can see that the shellcode is stored:
I am using Detect It Easy for the entropy analysis. I also replaced the calc payload with a stageless Meterpreter payload. This payload is quite large, and if we encrypt all of it, its location in the binary will become obvious due to the high entropy:
I also did the same with the PEzor packed binary and the .text section of the PE as a really high entropy score.
If you are unfamiliar with entropy scores, this is a good scale to get an idea:
0-1 Zeroed or very uniform data
3-5 Normal code or static data
7-8 Packed, compressed or encrypted data/payloads
As we can see, both PE files have a very high entropy score. This will likely trigger or alert some security products that use entropy analysis. I’ve been experimenting a bit and found some effective solutions to reduce the entropy score.
There are two types of entropy-based scans:
Chunk or section-based analysis: This method analyzes entropy in chunks of bytes or by PE section. It helps identify anomalous sections that may contain encrypted or packed data. For example, a high entropy value in the .rsrc section could indicate the presence of obfuscated content, even if the overall file entropy appears normal.
Overall file entropy analysis: This method calculates a single entropy score for the entire file.
But how do we get around this?
After some experimentation, I discovered that the most effective way is through payload staging or payload encoding. This approach avoids—or greatly reduces—payload encryption within the binary itself. Even if the shellcode is downloaded, it is loaded at runtime, so it doesn’t affect the binary’s entropy during the static analysis phase.
The graph you see below is from a msfvenom-encrypted staged payload located in the .data section. As you can see, the entropy is low because the number of encrypted or random bytes is significantly lower than in a stageless payload.
Conclusions
I hope you enjoyed the blog post and were able to bypass Windows Defender using the techniques covered here. However, this is just the beginning when it comes to evasion. EDR solutions are much trickier to bypass, and these techniques will only help avoid detection when the payload touches disk—execution is a completely different story.
But don’t worry! I’ll (hopefully) be releasing two more blog posts soon, focused on behavioral detection and post-exploitation detection.
Have fun experimenting with these techniques, and if you have any questions, feel free to ask in the community Discord!