Developing Modern Ransomware Part 1: User-Land
In this post, I walk through the process of building a modern piece of ransomware from an attacker’s perspective. The goal is to show, step‑by‑step, how an operator would think about assembling the core components of a payload and layering on the evasion techniques that help it slip past contemporary defenses. I examine the typical decision points behind features such as selective file‑targeting, API hashing, sandbox and debugger checks, trusted‑channel exfiltration, string obfuscation, abuse of code‑signing, execution timing tricks, vendor‑specific file avoidance, and DLL proxying. This attacker‑view narrative isn’t meant to enable real‑world deployment—it’s meant to give defenders a clearer understanding of the mindset, priorities, and tradecraft behind ransomware development. I wrap up with defensive considerations that translate these insights into practical detection ideas and hardening strategies.
DEVELOPMENT
Lorenzo Meacci @kapla
12/1/202521 min read

Introduction to ransomware
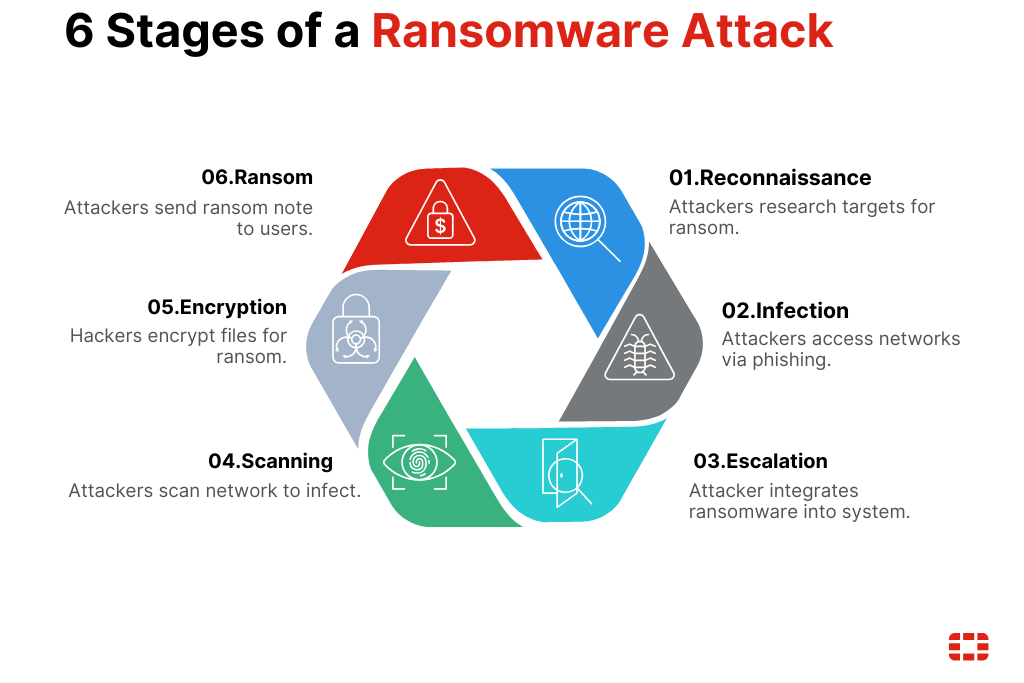
Many of you have probably already heard of ransomware attacks. These attacks involve deploying code that encrypts all important files on a machine and exfiltrates them to the attackers. Ransomware is one of the oldest categories of malware, and even today it remains one of the most critical risks companies and industries face.
Ransomware has a life cycle that can vary depending on how the attack is conducted. For example, a victim may be infected after downloading a malicious application from the internet, or threat actors may manually deploy ransomware across corporate systems after compromising the network. As you can imagine, these scenarios require different behaviors in the ransomware code. There is no need for ransomware to scan the network and propagate itself when attackers can spread it through more legitimate mechanisms, such as SCCM.
Like any type of malware, ransomware has evolved over the years. As security solutions became better at detecting static and behavioral patterns, attackers were forced to adapt the traditional ransomware model to bypass these protections.

although there are different types of ransomware (leakware, wipers, Scareware etc...) the general behavior is the same.
Detection
Like any other form of malware, defenders rely on common detection strategies to identify applications that exhibit ransomware-like static or dynamic patterns.
Some patterns can be summarized as follows:
Static indicators:
An import address table (IAT) containing functions commonly used for file operations, such as fseek, fopen, fwrite, and others
The presence of strings containing suspicious terms like “ransomware” or “encryption”
An unsigned binary
The file header of encrypted files
Behavioral indicators:
Rapid scanning of system files
Fast file modifications accompanied by noticeable entropy changes
Data exfiltration through illegitimate channels
These patterns help defenders identify ransomware, but they also give attackers a roadmap for what to avoid. As a result, newer ransomware strains have evolved to bypass both static and behavioral detection. In this first part, we look at how these evasion techniques are implemented in user-land.
What you will learn
In this blog I cover both the development of a modern ransomware samples and, at the end, how it can be statically and dynamically analyzed using reversing tools such as Ghidra. I start by introducing the required cryptography concepts, then move on to building the core ransomware components: the key-generation binary, the encryptor, and the decryptor. I conclude by outlining detection strategies.
The ransomware samples developed for this research include several modern features:
Encrypting only specific file extensions
API hashing
Sandbox evasion via time skips
Exfiltration over a trusted channel (Telegram)
String obfuscation
Binary signed with a leaked certificate
Sleep between file-processing rounds
Skipping vendor-specific canary files
DLL proxying a known application
The security solution used to evaluate the ransomware’s evasiveness is BitDefender Total Security, a product known for its strong detection capabilities, as also demonstrated in the video below.

Cryptography 101
Before we start developing ransomware, we should first understand its main weapon: cryptography. Cryptography is the science of protecting data and communication from being stolen or tampered with by unauthorized parties. This is achieved by applying mathematical algorithms to the data, making it completely unreadable. It’s important to remember that strong encryption does not rely on the secrecy of the algorithm itself, but on the mathematical strength that makes it infeasible to break.
Historically, there have been different types of encryption. Transposition ciphers simply shuffle existing data without changing the characters themselves. Substitution ciphers, on the other hand, replace characters with different ones to break patterns and introduce confusion, removing any linear relationship between the original data and the encrypted output.
Modern encryption algorithms combine both substitution and transposition to create far stronger, non-linear transformations that are mathematically resistant to reversal without the correct key.
An example of a substitution cipher is the Julius Caesar cipher, which shifts each letter of the alphabet by a fixed number of positions. For instance, shifting by three turns A → D, B → E, and so on. In this case the key is 3, and knowing this key allows us to decrypt the message. Most of you are probably thinking, “This can be brute-forced,” and you're absolutely right — it can be brute-forced easily, even by hand.
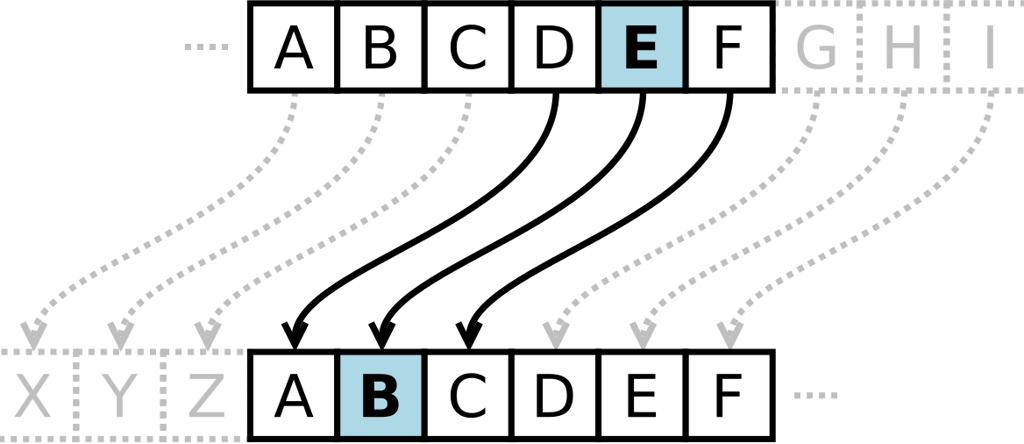
But the core idea remains the same: the secrecy of the message relies on not knowing how the cipher works. This goes against the first rule we discussed earlier, where strong encryption must remain secure even when the algorithm is public.
In modern ciphers, brute-forcing the key isn’t feasible. We’re no longer talking about a single-digit integer but a 2048-bit value, making exhaustive search practically impossible.
Asymmetric vs Symmetric cryptography
A major challenge in early cryptography was key security, and this led to the development of symmetric and asymmetric cryptography. They work very differently, yet both are widely used today in a hybrid approach, so let’s look at how they operate.
In symmetric encryption, the same key is used to both encrypt and decrypt data. Imagine you and I want to exchange private messages. I can’t simply mail you the key, because if someone intercepts it, they can decrypt all future messages. So we come up with a “solution”: you travel to Italy, I tell you the key in person, you memorize it, and from that moment on we can “securely” exchange letters. This example is obviously unrealistic for large-scale or real-world communication, and it highlights the main issue with symmetric encryption: secure key exchange.
This is where asymmetric encryption comes in. It almost feels magical, but it works. Instead of using the same key for everything, we use two keys:
• a public key, which anyone can know and use to encrypt data, and
• a private key, known only to the receiver, which is used to decrypt it.
This removes the need to secretly exchange a shared key beforehand. There are additional steps for things like authenticity and non-repudiation, but those will not be covered here.
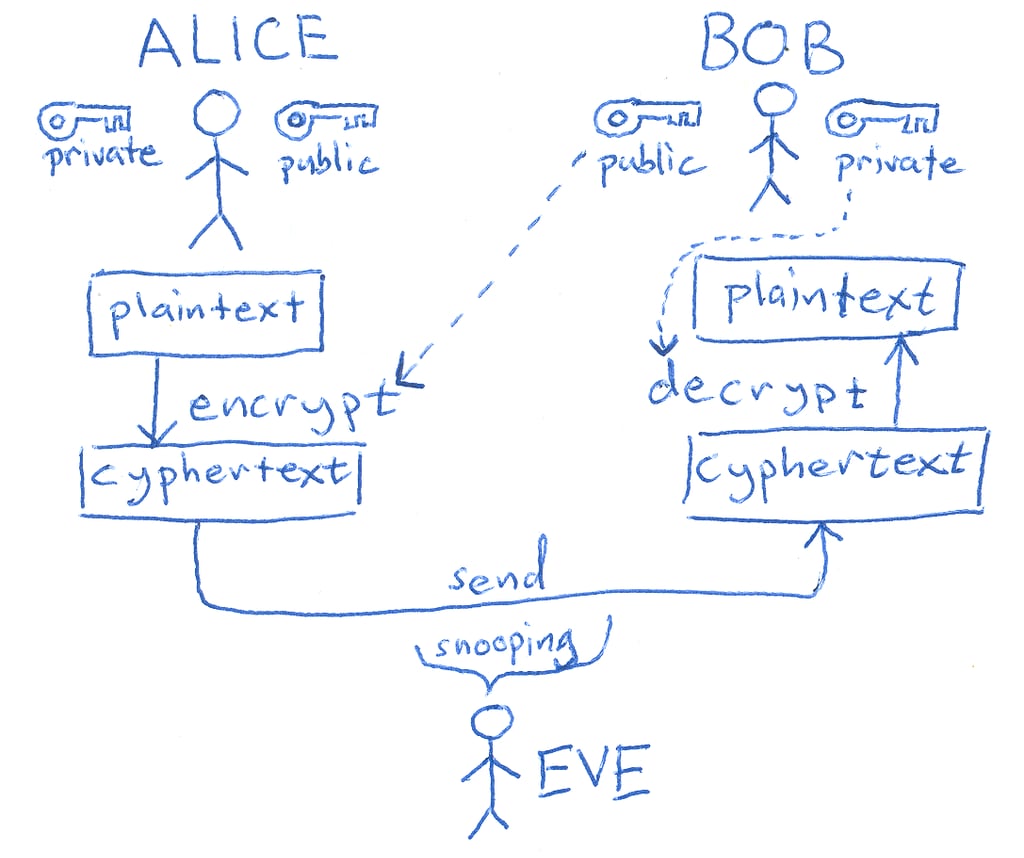

The hybrid approach is used because symmetric algorithms such as Triple DES are significantly faster than asymmetric algorithms like RSA. In practice, the symmetric algorithm encrypts the actual data, while RSA (or another asymmetric scheme) is used only to securely exchange the symmetric key.
Generating the key pair
This is the actual first step in our ransomware journey: we need to create a key pair, private and public. We could use online tools for this, but I think it is worth showing how to achieve it in C++. For this we will use the libsodium library. Note that the public key will be embedded in the ransomware code while the private key will be kept by the attacker. This means the victim will not receive the decryption key until the ransom is paid.
Also, the keys are generated in a raw binary format, meaning they will need to be Base64‑encoded before being output. This allows them to be directly inserted as variables in the ransomware code.
for a quick libsodium installation open one of the cmd command line tool from visual studio and run:
So for this task, I created a function that generates the key pair, Base64‑encodes both values, and writes them to two specified output files.
This is the code:
Remember that the Base64‑encoded keys should both have a length of 44 characters. If there’s a mismatch, you’ll have a hard time decrypting the data (in fact, it would be impossible). So make sure you get the expected output, as shown below:
So public_key.key “bzy/6k85ADupIGemQPdWlEMImuG4EBDsFRFMpEdVKAU=” is the string that will be placed inside the ransomware code
The f*/file stream APIs
Before we move one we should introduce the core APIs that will be used for the file operations and these are:
fseek() — Move the file pointer to a given position
ftell() — Return the current file pointer position
fwrite() — Write raw bytes/binary data to a file
fclose() — Close the file and flush buffers
fopen() — Open a file and return a FILE* handle
rewind() — Reset file pointer to the beginnin
Coding our first ransomware
Now it’s time to start building the ransomware code. I’ll guide you step by step through the development process. Keep in mind that at this stage the implementation has minimal evasion capabilities. We’ll gradually enhance and refine those techniques later in the blog.
Before we start, note that in Visual Studio you should change your project settings to use C++17. Any earlier standard will cause issues when working with std::filesystem, which is required for the upcoming implementation.
So the first function I implemented is called FileDirectoryWalker. Its job is to scan a specified directory, find all files that match given extensions, and return an array containing the full paths of those files.
This is done because we do not want to encrypt every file on the system, as that could cause unexpected behavior. Encrypting critical system files could easily lead to instability or even a complete system crash.
Next, I created the FileEncryptor function. This function takes a file path as a parameter, decodes the Base64‑encoded public key, opens the file, encrypts its contents, and then writes the encrypted data back to disk.
This will encrypt all files in the specified folder, but of course a basic ransomware like this will be detected almost immediately by any modern security solution. Below is a snapshot of BitDefender’s alerts generated when this implementation is run in the form of a malicious DLL.

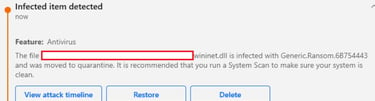
We can learn a lot from when the payload triggers the security solution. In this case, detection occurred the moment the DLL touched disk, strongly suggesting that the issue lies in static analysis. I’ve previously written a blog about bypassing static detection, but for this malware we’re going to approach things a bit differently.
For the time being, don’t worry too much about evasion—focus instead on understanding the moving parts of this ransomware. In most cases, the workflow is the same: collect the files to encrypt recursively, then iterate through each file and encrypt it.
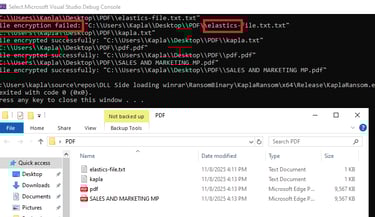
Build your solution in the form of an .exe and run it on your machine to encrypt some files in a specified path like I did:
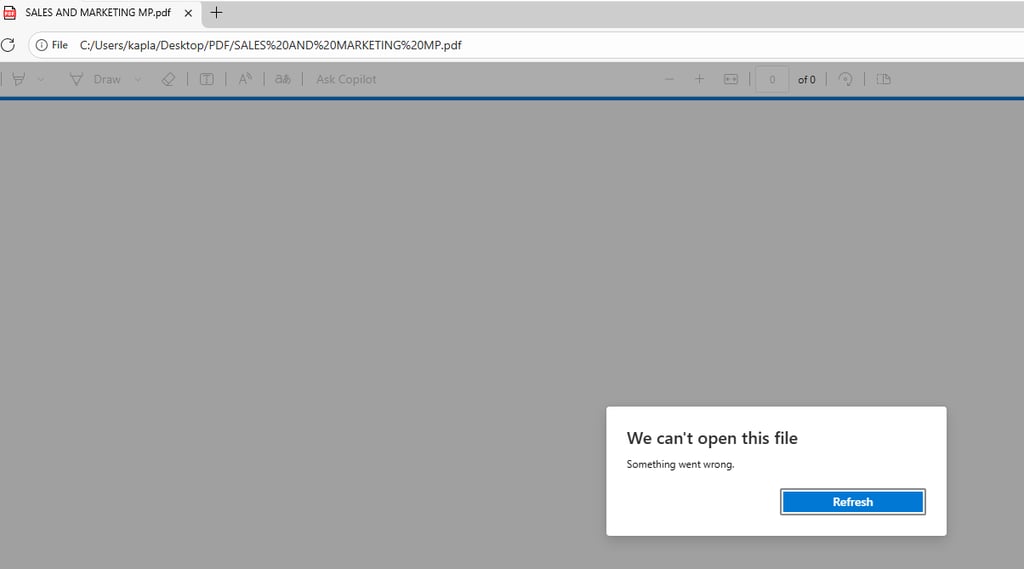


Now that you have some encrypted files is time to decrypt them!
Building the file Decryptor
If you try to open any file that was previously encrypted, you’ll notice it’s no longer readable, it’s just random data. To decrypt it, we need both the private and public key and pass them to the crypto_box_seal_open function. This function takes several parameters: a buffer where the plaintext will be written, the ciphertext, the size of the ciphertext, and the key pair. It’s essentially the counterpart to crypto_box_seal, which we used earlier for encryption.
It’s important to note that crypto_box_seal_open does not simply “decrypt anything.” It first checks for specific internal patterns that are always present in data encrypted with crypto_box_seal, such as the MAC (Message Authentication Code) and the ephemeral public key. If any of these checks fail or the data is not valid ciphertext, the function returns a non-zero value.
Because of this built-in validation, the magic header isn’t strictly necessary for safety, invalid data won’t be decrypted anyway. However, having the header still helps, since it allows us to avoid unnecessarily calling crypto_box_seal_open on files that were never encrypted, saving computational resources.
The FileDecryptor function starts by decoding the keys like in the previos function:
and initializing the Magic byte header values:
The file operations that use the f* functions work the same way as before, but what changes here is the use of two if statements that check whether the data is valid before passing it to the crypto_box_seal_open function. The first check verifies that the size of the data is large enough to contain both the magic bytes and the crypto box seal bytes. If the data is smaller than this minimum value then it is impossible for the file to have been encrypted by our ransomware. The second check verifies that the file header matches the one we added by using memcmp. Also remember to free the memory of the buffers to avoid memory leaks.
The final function should look something similar to this:
We can now run this on the encrypted files and we will quickly see that we are able to decrypt them succesfully!

This code makes heavy use of the f* API functions, and at this stage it is not in our interest to make it evasive. The reason is that in a typical ransomware scenario the encryption binary is shipped first and the decryption binary is only provided after payment. Because of this the ransom instructions could simply ask the company to create an exception rule for the decryption binary, removing the need for any evasion on that component.
Making the ransomware evasive
Before applying what you learn in this section I highly recommend testing the previous code and saving it somewhere. Now create a new project and follow along. This will be a long chapter in which we will not only modify the existing ransomware code but also add new features such as data exfiltration capabilities.
API hashing
This technique was already covered in the bypassing static analysis blog post, so I will briefly revisit it here and also show why the previous code can cause issues. API hashing is a technique used by attackers to hide the APIs being used by removing them from the import address table. This prevents security solutions from easily identifying the functions a program relies on and inferring its intent. Instead of importing functions normally, we resolve their virtual addresses dynamically at runtime by iterating through the exports of the target module. For the f* functions we iterate through ucrtbase.dll. Since we return a function pointer, the C code does not inherently know what parameters the function expects, so we must create a function prototype. This prototype must match the official documentation exactly.
I am not the creator of this function. I took it from ired.team , so full credit goes to them. However, the getHashFromString function has a known issue. It is not uncommon for it to produce identical hashes for different APIs. The following example demonstrates the problem
This is the code used for generating the hashes:
this will give back:
For this reason, since _write appears before fwrite, the address returned will be the one for write. This leads to errors because it is a completely different API. To avoid this issue, I replaced the hashing algorithm with HashStringJenkinsOneAtATime32Bit, which produces unique hashes. The main function getFunctionAddressByHash can then use that hash instead. The code should look something like this:
The last thing left to do is to crete the function prototypes. To keep my code clean I created a new header file and named it functions.h and placed the following code:
Now to resolve them you can use this compact form:
Now pFseek for instance can be used like fseek and so on.
Slowing down the ransomware
Encrypting files at very high speed will eventually raise suspicion from security solutions. A simple mitigation is to add a delay between each file operation. In this case, inside the main function where the for loop is located, we add a Sleep call after each encrypted file to pause execution for about two seconds. Once seven files have been encrypted, the program sleeps for ten seconds, resets the counter to zero and repeats the cycle.
Signing the binary
Another way to make the binary appear more benign is to sign it with a legitimate code signing certificate. These certificates are not free and require verification before you can obtain one, and even if you managed to buy a certificate under your company name, using it for malware would immediately expose your identity. A more practical approach is to use already leaked certificates, although this is not straightforward. To sign a binary you need the private key stored inside a PFX or P12 file, and there is no way to know whether the certificate supports code signing until you decrypt it.
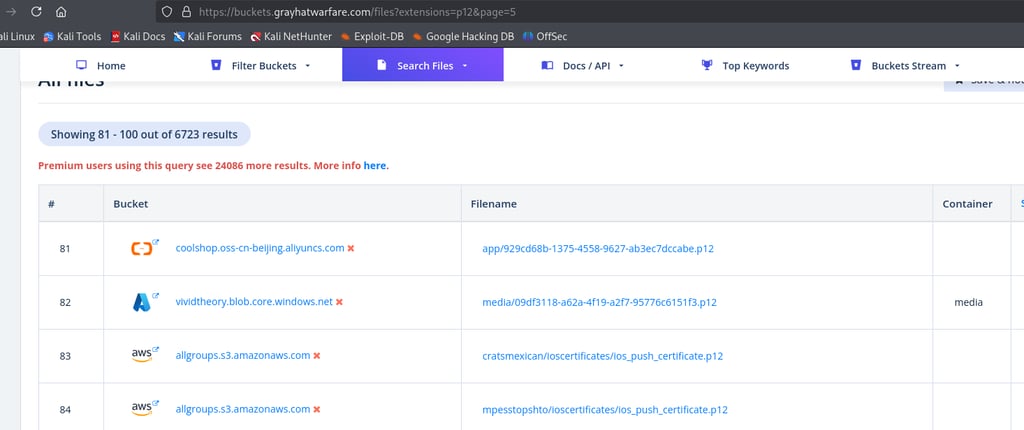
To gather large numbers of PFX or P12 files you can use https://buckets.grayhatwarfare.com. This platform is a gold mine because thousands of files of all kinds are exposed inside cloud storage containers, and we can easily filter for what we are searching for.
Sign in and search for any file with the PFX or P12 extension.
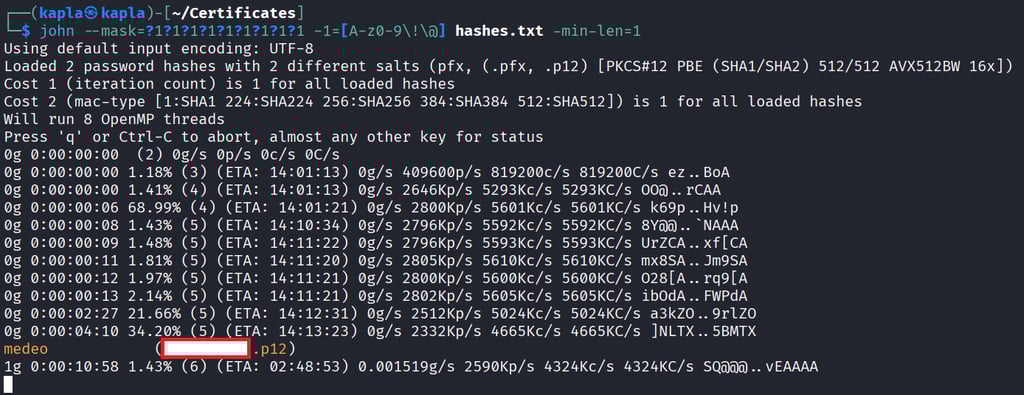
you can then extract the hashes with:
and then you can either crack the hash with a dictionary attack e.g using rockyou.txt or via a mask like so:
then you can get the ceritificate infos like so:
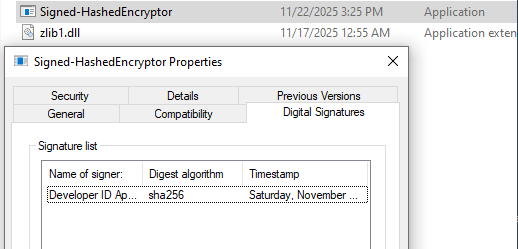
With this certificate we can sign the binary:

Now you can see that the bionary is signed in windows by navigating to the file properties -> Digital signature:
Signing a binary with a certificate is incredibly useful when dealing with SmartScreen. SmartScreen is a Windows Defender feature designed to protect users from phishing and web-based attacks. It works together with Mark of the Web (MotW), which is a zone identifier used to label files with a number that represents where they came from.
These zones include:
Local intranet Zone 1 which refers to internal organizational resources
Trusted sites Zone 2 which contains websites you explicitly trust
Internet Zone 3 which applies to most websites on the public internet and is the zone most downloaded files come from
Restricted sites Zone 4 which includes potentially harmful locations
SmartScreen evaluates both the MotW tag and whether a binary is signed. Files downloaded from the internet that are unsigned or signed by an unknown publisher will trigger warnings.
Skipping canary files
Sometimes advanced security solutions place canary files in user directories and periodically check whether they have been tampered with. Elastic used this technique in the past and may still use it today, and other vendors continue to rely on similar mechanisms. To bypass this type of detection, the ransomware can simply check the filename and look for patterns that indicate it belongs to a security product. For example, consider the following detection rule:

Hiding the Console
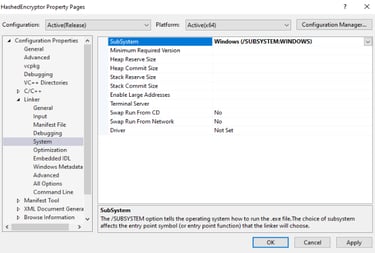
This is not really an evasion feature but more a way to avoid raising awareness for the user. Console applications, as the name suggests, will open a command prompt window when executed, making the process visible to the user, who may close it and terminate the malware. A stealthier approach is to hide the console entirely. We can achieve this in Visual Studio.
One simple method is to use the WinMain trick. To do this, replace the main() function with WinMain(), then go into Visual Studio and make the following changes:
Right-click your project → Properties
Go to Linker → System
Find Subsystem
Change:
Console (/SUBSYSTEM:CONSOLE)
To:
Windows (/SUBSYSTEM:WINDOWS)

and the main function will become:
String Obfuscation
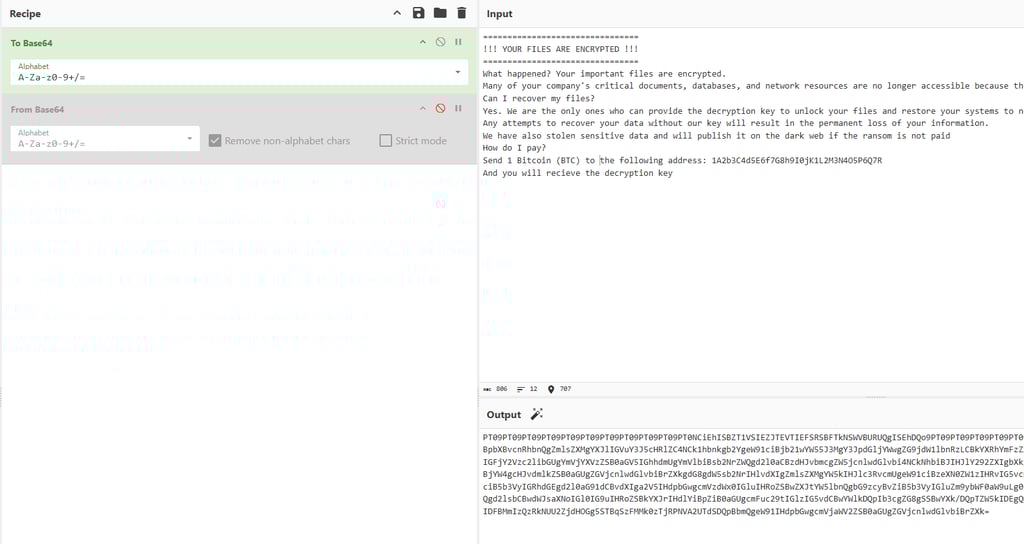
At the end of the encryption process we also want to leave a note on the desktop containing the steps and payment instructions the victim is expected to follow in order to recover their data. For this reason I created the following message:
The only issue is that I do not want it to be in plaintext, because security solutions can still statically analyze the variable and detect suspicious strings such as “YOUR FILES ARE ENCRYPTED”. For this reason we need to Base64-obfuscate the message using a tool such as CyberChef and decode it at runtime.

Remember that the alphabet you choose in CyberChef must match the one you use in libsodium. The alphabet needs to be specified in pSodiumBase642Bin e.g sodium_base64_VARIANT_ORIGINAL.
It is important to note that some security solutions can decode Base64 strings directly from binaries and analyze them, so I recommend not relying solely on encoding. Implementing something like string stacking is a better approach. In C or C++ a string can be represented as an array of characters, with each character separated, effectively evading simple string based detection. Since manually inserting commas between every character would be tedious, I wrote a basic Python script that outputs the message in the C++ array format you need. I think encoding is preferred because it does not change file entropy, which some security solutions such as Elastic pay particular attention to. It is always good to keep entropy low.
We also need a way to find the users desktop, to do so we can use the GetUserNameA WINAPI and build the path to the user desktop like so:
the final function should look similar to this:
Sandbox evasion and AntiDebugging
In modern environments, malware samples are often analyzed not only by security solutions but also by human analysts in isolated setups such as virtual machines and debuggers. This means that every artifact we create may be inspected, reversed, or behaviorally monitored. For this reason it is crucial for attackers to keep their samples as resilient as possible, reducing the amount of meaningful information an analyst can extract and making the analysis process slower and less effective. The goal is to maximize the chances that, if the artifact is later deployed again in the same environment, the blue team has not been able to extract enough indicators to build reliable detection rules.
There are numerous anti debugging and sandbox evasion techniques, and I will cover two of them here. First, our binary will check whether a debugger is attached to the process. Second, it will verify whether it is running inside a virtual machine. If any of these checks return positive, the program will either abort execution or redirect to something benign.
Is Debugger Present?
In Windows, the Process Environment Block (PEB) is a structure that contains information about a running process, including its loaded modules (like DLLs), environment variables, and process parameters. Most importantly for us, it contains some flags indicating the process state, such as whether it's being debugged. This is the struct for reference:
https://learn.microsoft.com/en-us/windows/win32/api/winternl/ns-winternl-peb
The BeingDebugged flag is equal to 1 (TRUE) or 0 (FALSE). Instead of using the IsDebuggerPresent WINAPI, which is suspicious, we can simply create our own function, access the value of BeingDebugged from the PEB, and determine if our ransomware is being debugged or not.
To get access to this structure, you need to include winternl.h in your project:
Now we can test this out in Visual Studio by running the application using Local Windows Debugger:

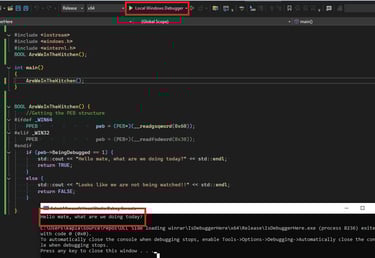
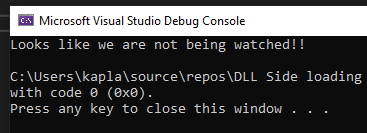
Viceversa when we run it normaly:
Now we can continue on building upon this function and adding a Virtual Environment check.
Checking the manufacturer
A quick way to determine if we are inside a VM or not is to check the SystemManufacturer by querying the "HKLM\HARDWARE\DESCRIPTION\System\BIOS" registry key. As you can see from the image below, I get “VMware” in the VM and “Micro-Star” on my host PC.
You can query this regestry in C++ using the RegGetValueA WinAPI, and then search for known VM providers:

The final function should look something like this:
DLL proxying a trusted application
In modern malware, backdooring trusted applications is becoming increasingly common. In the Advanced Initial Access Techniques blog post, I showed how to identify applications vulnerable to DLL sideloading. This technique takes advantage of the Windows DLL search order:
The directory of the executable
C:\Windows\System32
C:\Windows\System (16-bit, rarely used)
C:\Windows
Current working directory (CWD)
Directories in the system PATH
Directories in the user PATH
I won't go into detail on finding suitable binaries, since that process is the same as in the blog post. Instead, I want to focus on improving the technique.
In short, DLL sideloading works by replacing a DLL located in the application folder or by adding one that the application expects but cannot find. The issue with simply doing this is that the application will likely fail, because it attempts to call exported functions that do not exist in our malicious DLL.
To solve this, attackers use DLL proxying, which forwards all exported functions to the legitimate DLL. This allows the application to operate normally while still giving us execution. In this scenario, a common approach is to run our code from DllMain, since it executes whenever the DLL is loaded. However, some actions—such as establishing network connections—are forbidden inside DllMain, as Microsoft restricts them to avoid deadlocks during load time.
Depending on how the application works, we may be able to run our code entirely inside DllMain, but while it executes, the application will freeze. Alternatively, we can spawn a new thread, but keep in mind that if the main process (the application) exits, the spawned thread terminates with it. This means we need a way to keep the process alive.

credit to https://pentestlab.blog for the image
The vulnerable application we are targetting is openssl.exe and as you can see from the debugger it loads some dll's from the app directory at startup
To proxy a function in C/C++ you can use the following notation:
The libcrypto-3-x64 DLL contains a large number of exported functions, and writing all the proxy links by hand would be completely impractical. Fortunately, there is an excellent tool called Sparacus that takes a DLL as input and automatically generates the proxy template for us.
Now in the openssl folder you can move the libcrypto-3-x64.dll to something like crypto.dll and inside the Spartacus template you should change each linker line to have the crypto name in it: Compile it and copy the spartacus ibcrypto-3-x64.dll in the openssl folder. E.g:

Before copying the code from the executable project you created earlier, it is important to configure your Visual Studio solution correctly. In my case, the ransomware DLL depends on other DLLs such as zlib1.dll, libcurl.dll, and libsodium.dll. These libraries must match the C runtime configuration used by our own DLL. To ensure compatibility, go to C/C++ → Code Generation and set the Runtime Library option to Multi-threaded DLL.

Now in the DLL main you can run your code by popping a thread: where run is the equivalent of you main() function
Now we need a command that will keep openssl running for a long period of time, an example is the one below:
Exfiltration via Telegram
To complete the ransomware, the final component to add is an exfiltration capability. Modern ransomware groups rarely rely on encryption alone. Instead, they use a double‑extortion model, where they not only encrypt the victim’s files but also exfiltrate them, threatening to publish the data if the ransom is not paid.
Security products have adapted to this trend. BitDefender, for example, is very effective at flagging connections to unknown or newly created domains that have no established reputation. On top of that, corporate environments often use multilayer enterprise firewalls and deep packet inspection, which makes it extremely risky and poor OPSEC to exfiltrate data to attacker‑controlled domains. This method has become outdated in real‑world operations.
To bypass these defenses, attackers have shifted toward External C2 channels. Instead of talking directly to an attacker infrastructure, the malware sends data through trusted, well‑known services and then routes it back to the attacker. Because the traffic blends in with normal enterprise activity, it is far less likely to be flagged as suspicious or trigger alerts for unusual network behavior.
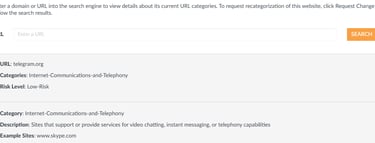
For this reason I decided to use Telegram as the exfiltration channel. A quick way to evaluate how security products or enterprise firewalls might classify a domain is to check it on Palo Alto’s “Test a Site” service. This gives you an idea of how the domain is categorized, whether it’s considered safe or risky, and how likely it is that network security appliances will block or inspect the traffic. https://urlfiltering.paloaltonetworks.com
This is the Telegram API documentation:
https://telegram-bot-sdk.readme.io/reference/senddocument
The part we care about is the sendDocument API endpoint.
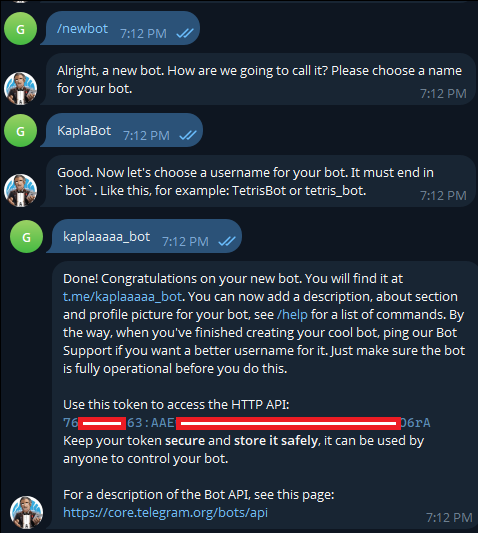
Since we will be using the Bot API, the first step is to create a Telegram bot and obtain its bot token.
To do that, open Telegram and start a chat with @BotFather. From there, create a new bot and BotFather will return the token needed to authenticate your requests.
Now we can send a file using this url with the provide APi token:
and we need to specify the following parameters: the client_id, which is the user we want to send the messages to, and the document.
to get your own chat_id you can chat with https://telegram.me/userinfobot
You can then interact with the API endpoint using curl in C++

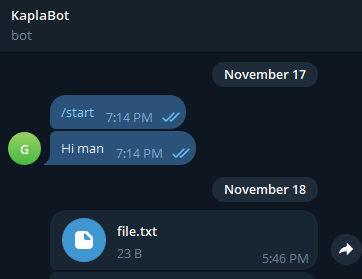
Demo:

Final improvements
In my code I also changed the function names to benign names e.g FileEncrypt was changed to ILikeMayonnaise and so on. Also, it would be useful to add some persistence technique to the ransom code, but I will leave this challenge to you.
Defending against modern ransomware attacks
There is never a single technique that reliably identifies all ransomware, just as there is no single bypass that makes malware Fully Undetectable. Ransomware defense must be layered and resilient. One of the most effective strategies is maintaining regular, automated backups stored on isolated systems or offline media. By ensuring the backups are not directly reachable from production networks, you greatly reduce the risk of ransomware encrypting both the live environment and its recovery data, which is a common failure point in many incidents.
Network-level monitoring has also become essential. Modern ransomware groups often rely on exfiltrating data before encryption to increase pressure on victims, so defenders should focus on identifying unusual outbound traffic and connections to cloud services, messaging platforms, or API endpoints not commonly used by the organization. For example, monitoring access to domains such as api.telegram.org—particularly from servers or endpoints that have no business reason to communicate with it—can help surface attempted exfiltration. Similar rules should be created for other platforms including Discord, Slack, OneDrive, Google Drive, and generic file-sharing services, as adversaries frequently migrate between trusted channels to avoid detection.
Finally, a mature defense strategy includes regular tabletop exercises, incident response playbooks, strict access control policies, and the principle of least privilege. Organizations should also rely on qualified security professionals to conduct controlled ransomware simulations or adversary‑emulation exercises. These assessments help validate EDR and SIEM configurations, uncover visibility gaps, and reveal which behaviors are detected versus which slip under the radar, allowing teams to tune and harden their controls accordingly. Ensuring users do not have unnecessary administrative rights drastically reduces the blast radius of a compromised machine. Combined with disciplined patch management and robust logging, these measures significantly increase the likelihood of detecting or stopping the attack before encryption spreads.
No single control is perfect, but layering these safeguards significantly increases an organization’s resilience and reduces the operational impact of ransomware campaigns.
Note that a magic header is added at the start of each file to “recognize” them. You can use any header you want. This watermark allows the decryptor to quickly identify whether a file has been encrypted or not.
These functions can be used together: first to gather the files, then to iterate through each one in a loop and encrypt them.